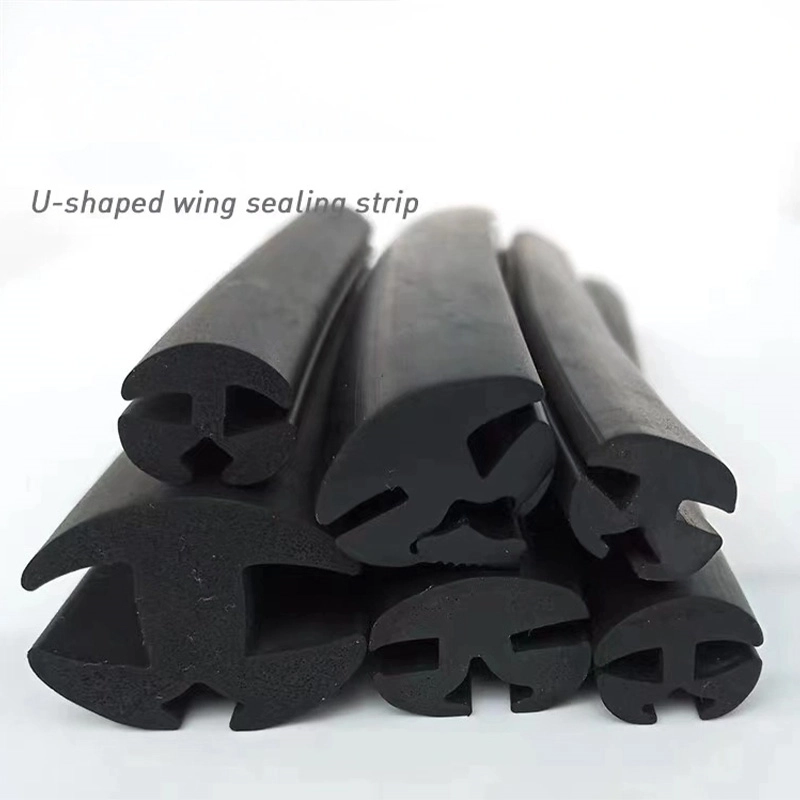
fixing weather stripping on a door
Fixing Weather Stripping on a Door A Step-by-Step Guide
Weather stripping is an essential component of any home, providing insulation and protection against the elements. It helps to keep your home warm in winter and cool in summer by preventing air leaks around doors and windows. If you’ve noticed drafts, increased energy bills, or wear and tear on your weather stripping, it may be time to fix or replace it. In this guide, we will explore the steps to effectively repair or install weather stripping on a door, ensuring your home remains comfortable and energy efficient.
Understanding Weather Stripping
Before diving into the repair process, it's crucial to understand what weather stripping is and its purpose. Weather stripping refers to various types of materials used to seal gaps around doors and windows. These materials can include foam, vinyl, rubber, and metal. Over time, weather stripping can wear out, split, or become dislodged, leading to drafts and increased energy costs.
Tools and Materials Needed
To fix or replace weather stripping on your door, you’ll need the following tools and materials - New weather stripping (select the right type for your door) - Utility knife or scissors - Measuring tape - Screws and a screwdriver (if required) - Ruler or straight edge - Cleaning supplies (cloth and mild cleaner)
Step 1 Remove Old Weather Stripping
Start by examining your door to identify the type of weather stripping currently in place. If it's worn or damaged, it will need to be removed. Use a utility knife to carefully cut through the old weather stripping, being cautious not to damage the door frame or surface. For adhesive strips, you may need to peel them away gently. Once removed, clean the area where the weather stripping was attached to ensure a proper bond with the new strip.
Step 2 Measure the Door
Accurate measurements are key when installing new weather stripping. Use a measuring tape to determine the length of each side of the door frame. If the door is a standard size, you can often find pre-cut weather stripping lengths in home improvement stores. However, if your door is custom, you may need to buy a longer strip and cut it to size.
Step 3 Choose the Right Weather Stripping
fixing weather stripping on a door

There are various types of weather stripping available, and choosing the right one depends on your door type and the size of the gaps. Here are a few common options - Foam Tape Ideal for small gaps and easy to install. - V-strip (Tension Seal) Works well for double doors and gaps along the edges. - Rubber Weather Stripping Durable and effective for external doors. - Metal Weather Stripping Best for heavy-duty applications.
Step 4 Install New Weather Stripping
With your measurements taken and the appropriate material selected, it's time to install the new weather stripping. If you’re working with adhesive strips 1. Cut the strip to length based on your measurements. 2. Peel back the adhesive backing and press the weather stripping firmly onto the door frame, starting at the top and working your way down.
For types that require screws 1. Position the weather stripping in place and mark the spots where you’ll be drilling. 2. Pre-drill holes if necessary, then secure the strip with screws, ensuring it is snug but not overly tight to avoid pinching.
Step 5 Test for Proper Seal
Once you've installed the new weather stripping, it’s essential to test its effectiveness. Close the door and run your hand along the edges to check for any drafts. A good seal should feel solid without noticeable gaps. If you notice any air leaks, adjust the weather stripping accordingly.
Step 6 Regular Maintenance
Maintaining your weather stripping is crucial to prolonging its lifespan. Regularly inspect it for signs of wear or damage, especially after extreme weather changes. Clean the surface to prevent dirt build-up, which can deteriorate the material over time.
Conclusion
Fixing or replacing weather stripping on your door is a straightforward yet vital task for maintaining a comfortable and energy-efficient home. By following these steps, you can ensure that your doors are adequately sealed, helping to reduce your energy bills and improving your home’s overall comfort. Whether you handle this as a DIY project or seek help from professionals, addressing weather stripping issues is a smart investment in your home’s efficiency.
Share
-
The Best Lubricants for Aluminum Roller GuidesNewsJul.23,2025
-
Slitting Machine Applications in the Packaging IndustryNewsJul.23,2025
-
Rolling Roller Balancing Techniques for Smooth OperationNewsJul.23,2025
-
How To Optimize An EV Battery Assembly LineNewsJul.23,2025
-
Energy Efficiency in Modern Battery Formation EquipmentNewsJul.23,2025
-
Automation Trends in Pouch Cell Assembly EquipmentNewsJul.23,2025


